
Blogs
Tarnplanen: Der ultimative Ratgeber für Sichtschutz, Outdoor und Industrie

In einer Welt, in der Privatsphäre und Schutz vor den Elementen immer wichtiger werden, haben sich Tarnplanen als unverzichtbare Allrounder etabliert. Ob im privaten Garten als diskreter Sichtschutz, bei der Jagd zur perfekten Tarnung oder im industriellen Bereich zur Abdeckung wertvoller Güter – die Einsatzmöglichkeiten sind nahezu unbegrenzt. Doch was macht eine hochwertige Tarnplane eigentlich aus? Es geht nicht nur um das optische Muster, sondern vor allem um Materialbeschaffenheit, UV-Beständigkeit und die Reißfestigkeit unter extremen Bedingungen.
In diesem ausführlichen Ratgeber werfen wir einen detaillierten Blick auf die Welt der Tarnplanen. Wir klären auf, welche unterschiedlichen Typen es gibt, worauf Sie beim Kauf achten sollten und wie Sie die Lebensdauer Ihrer Abdeckplane durch die richtige Pflege massiv verlängern können.
Was genau sind Tarnplanen?
Unter dem Begriff Tarnplanen versteht man spezialisierte Abdeckplanen, die mit einem Camouflage-Muster versehen sind. Im Gegensatz zu herkömmlichen blauen oder grünen Baumarkt-Planen fügen sich diese Modelle harmonisch in die natürliche Umgebung ein. Dies wird durch verschiedene Farbkombinationen wie Woodland, Flecktarn oder Desert-Design erreicht.
Der technische Aufbau einer Tarnplane besteht meist aus einem robusten Gewebe (oft Polyethylen oder PVC), das beidseitig beschichtet ist. Diese Beschichtung sorgt dafür, dass die Plane wasserfest, schimmelresistent und witterungsbeständig bleibt. Für den Nutzer bedeutet das: Schutz und Tarnung in einem Produkt.
Die wichtigsten Materialarten von Tarnplanen
Nicht jede Plane ist für jeden Zweck geeignet. Die Wahl des Materials entscheidet darüber, ob Ihre Tarnplane nur einen Sommer übersteht oder viele Jahre lang treue Dienste leistet.
-
PE (Polyethylen): Diese Planen sind leicht, preiswert und ideal für den temporären Einsatz. Sie lassen sich einfach falten und transportieren, was sie bei Campern besonders beliebt macht.
-
PVC (Polyvinylchlorid): Wenn Sie nach einer LKW-Planen-Qualität suchen, ist PVC die richtige Wahl. Diese Tarnplanen sind extrem schwer, reißfest und halten auch starkem Schneefall oder Hagel stand.
-
Gewebeverstärkte Planen: Hier wird ein Textilnetz in den Kunststoff eingearbeitet. Dies verhindert, dass kleine Risse bei Belastung weiter aufreißen.
Gewichtsklassen und Stabilität
Ein entscheidendes Qualitätsmerkmal ist das Flächengewicht, angegeben in Gramm pro Quadratmeter (g/m²). Während leichte Freizeit-Tarnplanen oft bei 100-150 g/m² liegen, fangen professionelle Industriemodelle erst ab 250 g/m² oder gar 600 g/m² an. Je höher dieser Wert, desto langlebiger ist das Produkt.
Vielfältige Einsatzbereiche für Tarnplanen
Warum sollte man sich für eine Tarnplane entscheiden, wenn es auch normale Planen gibt? Die Antwort liegt in der diskreten Optik und der psychologischen Wirkung der Tarnung.
1. Sichtschutz im Garten und auf dem Balkon
Ein Klassiker: Sie möchten Ihr Kaminholz stapeln oder die Mülltonnen verstecken, ohne dass eine grelle Plastikplane das Gesamtbild Ihres Gartens stört. Hier bieten Tarnplanen die perfekte Lösung, da sie optisch mit Hecken und Bäumen verschmelzen.
2. Jagd und Outdoor-Aktivitäten
Für Jäger und Naturfotografen ist die Tarnung überlebenswichtig bzw. entscheidend für den Erfolg. Eine Tarnplane dient hier als schneller Ansitzschirm oder zur Verblendung von Hochsitzen. Dank der matten Oberfläche werden Lichtreflexionen minimiert, die Tiere verschrecken könnten.
3. Militärische und taktische Nutzung
Im professionellen Bereich werden Tarnplanen zur Abdeckung von Fahrzeugen, Ausrüstung und temporären Unterständen genutzt. Hier kommen oft Infrarot-absorbierende Materialien zum Einsatz, die auch vor moderner Aufklärungstechnik schützen.
4. Baugewerbe und Industrie
Auf Baustellen dienen sie dazu, Baumaterialien wie Sand, Zement oder Maschinen vor neugierigen Blicken und Diebstahl zu schützen. Eine unauffällige Tarnplane zieht weniger Aufmerksamkeit auf sich als eine leuchtend blaue Abdeckung.
Qualitätsmerkmale: Worauf Sie beim Kauf achten müssen
Damit Ihre Investition in eine Tarnplane nicht zum Reinfall wird, sollten Sie auf folgende Details achten:
-
Verstärkte Säume: Der Rand der Plane sollte umgeschlagen und vernäht oder verschweißt sein. Das erhöht die Stabilität massiv.
-
Rostfreie Ösen: Achten Sie auf Aluminium- oder Messingösen in regelmäßigen Abständen (idealerweise alle 50 cm). Dies erleichtert die Befestigung mit Expanderseilen oder Kabelbindern.
-
UV-Stabilisierung: Ohne UV-Schutz wird Kunststoff unter Sonneneinstrahlung schnell spröde und bricht. Eine gute Tarnplane ist explizit als UV-beständig gekennzeichnet.
-
Beidseitige Bedruckung: Hochwertige Modelle haben das Tarnmuster oft auf beiden Seiten oder zumindest eine dunkle Rückseite, um Durchscheinen zu verhindern.
Die verschiedenen Tarnmuster im Überblick
Das Muster Ihrer Tarnplane sollte immer auf die Umgebung abgestimmt sein, in der sie eingesetzt wird.
-
Woodland: Das klassische Waldmuster mit Grün-, Braun- und Schwarztönen. Perfekt für mitteleuropäische Wälder und Gärten.
-
Digital Camo: Ein modernes, gepixeltes Muster, das Konturen besonders effektiv auflöst.
-
Desert / Wüste: Sandfarbene Töne für trockene Umgebungen oder kiesige Baustellen.
-
Schneetarn: Weiße und graue Nuancen für den Einsatz im Winter.
Montage und Befestigung von Tarnplanen
Eine Tarnplane ist nur so gut wie ihre Befestigung. Windlasten können enorme Kräfte entwickeln, die selbst stabile Ösen ausreißen lassen, wenn die Spannung nicht stimmt.
Profi-Tipp: Verwenden Sie niemals starre Seile zur Befestigung an festen Objekten. Nutzen Sie stattdessen elastische Gummispanner. Diese fangen Windstöße ab und agieren wie ein Stoßdämpfer. Wenn Sie die Plane als Sichtschutz an einem Zaun anbringen, sind UV-beständige Kabelbinder oft die schnellste und effektivste Lösung.
Achten Sie bei der Montage auch auf den Wasserablauf. Wenn sich auf der Tarnplane Wassersäcke bilden, führt das Gewicht früher oder später zum Versagen des Materials. Eine leichte Neigung ist daher Pflicht.
Pflege und Lagerung für maximale Langlebigkeit
Obwohl Tarnplanen für den Außenbereich konzipiert sind, danken sie es Ihnen mit einer längeren Lebensdauer, wenn Sie ein paar Grundregeln beachten:
-
Reinigung: Schmutz, Algen und Vogelkot sollten regelmäßig mit klarem Wasser und einer weichen Bürste entfernt werden. Vermeiden Sie scharfe chemische Reiniger, da diese die Beschichtung angreifen können.
-
Trocknung: Packen Sie eine nasse Tarnplane niemals für längere Zeit zusammen. Es drohen Stockflecken und unangenehme Gerüche.
-
Lagerung: Lagern Sie die Plane an einem kühlen, trockenen Ort ohne direkte Sonneneinstrahlung, wenn sie nicht gebraucht wird.
Fazit: Warum Tarnplanen die bessere Wahl sind
Ob für den Schutz privater Güter, als taktische Ausrüstung oder als robuster Wetterschutz – Tarnplanen vereinen Funktionalität mit ästhetischer Diskretion. Wer Wert auf Qualität legt, greift zu gewebeverstärkten Modellen mit hoher g/m²-Zahl und UV-Schutz. Die Investition in eine professionelle Plane zahlt sich durch die jahrelange Nutzbarkeit und den zuverlässigen Schutz Ihrer Werte doppelt aus.
Setzen Sie auf die richtige Tarnplane, um in jeder Umgebung geschützt und gleichzeitig unauffällig zu bleiben. Ob im tiefen Wald oder im heimischen Garten: Diskretion und Schutz waren noch nie so einfach zu kombinieren.
Häufig gestellte Fragen (FAQs)
1. Sind Tarnplanen komplett wasserdicht?
Ja, die meisten Tarnplanen aus PE oder PVC sind zu 100% wasserdicht. Das Wasser perlt an der beschichteten Oberfläche ab. Wichtig ist jedoch die korrekte Montage, um Staunässe zu vermeiden.
2. Wie finde ich die richtige Größe für meine Tarnplane?
Messen Sie das zu bedeckende Objekt großzügig aus. Da Planen oft durch Säume leicht kleiner ausfallen können (sogenanntes Schnittmaß vs. Fertigmaß), sollten Sie pro Seite etwa 20-30 cm Puffer einplanen.
3. Kann man Tarnplanen zuschneiden?
Einfache PE-Planen lassen sich zuschneiden, allerdings fransen die Kanten dann aus und die Stabilität geht verloren. Bei PVC-Modellen ist das Zuschneiden möglich, erfordert aber ein anschließendes Verschweißen oder Kleben der Ränder, um die Reißfestigkeit zu erhalten.
4. Wie lange hält eine Tarnplane im Freien?
Die Lebensdauer hängt stark vom Material und der UV-Einstrahlung ab. Eine einfache Baumarkt-Plane hält oft 1-2 Jahre, während hochwertige, schwere Tarnplanen aus PVC bei guter Pflege 5 bis 10 Jahre und länger halten können.
5. Gibt es geräuscharme Tarnplanen für die Jagd?
Ja, es gibt spezielle “Soft-Tarnplanen” oder Tarnnetze mit Stoffanteil, die bei Wind weniger rascheln als reine Kunststoffplanen. Für die Jagd ist dies ein entscheidender Faktor, um das Wild nicht durch unnatürliche Geräusche zu beunruhigen.
Blogs
Candy AI: The Complete Guide to Virtual AI Companions, Features, Benefits, and Future Innovations
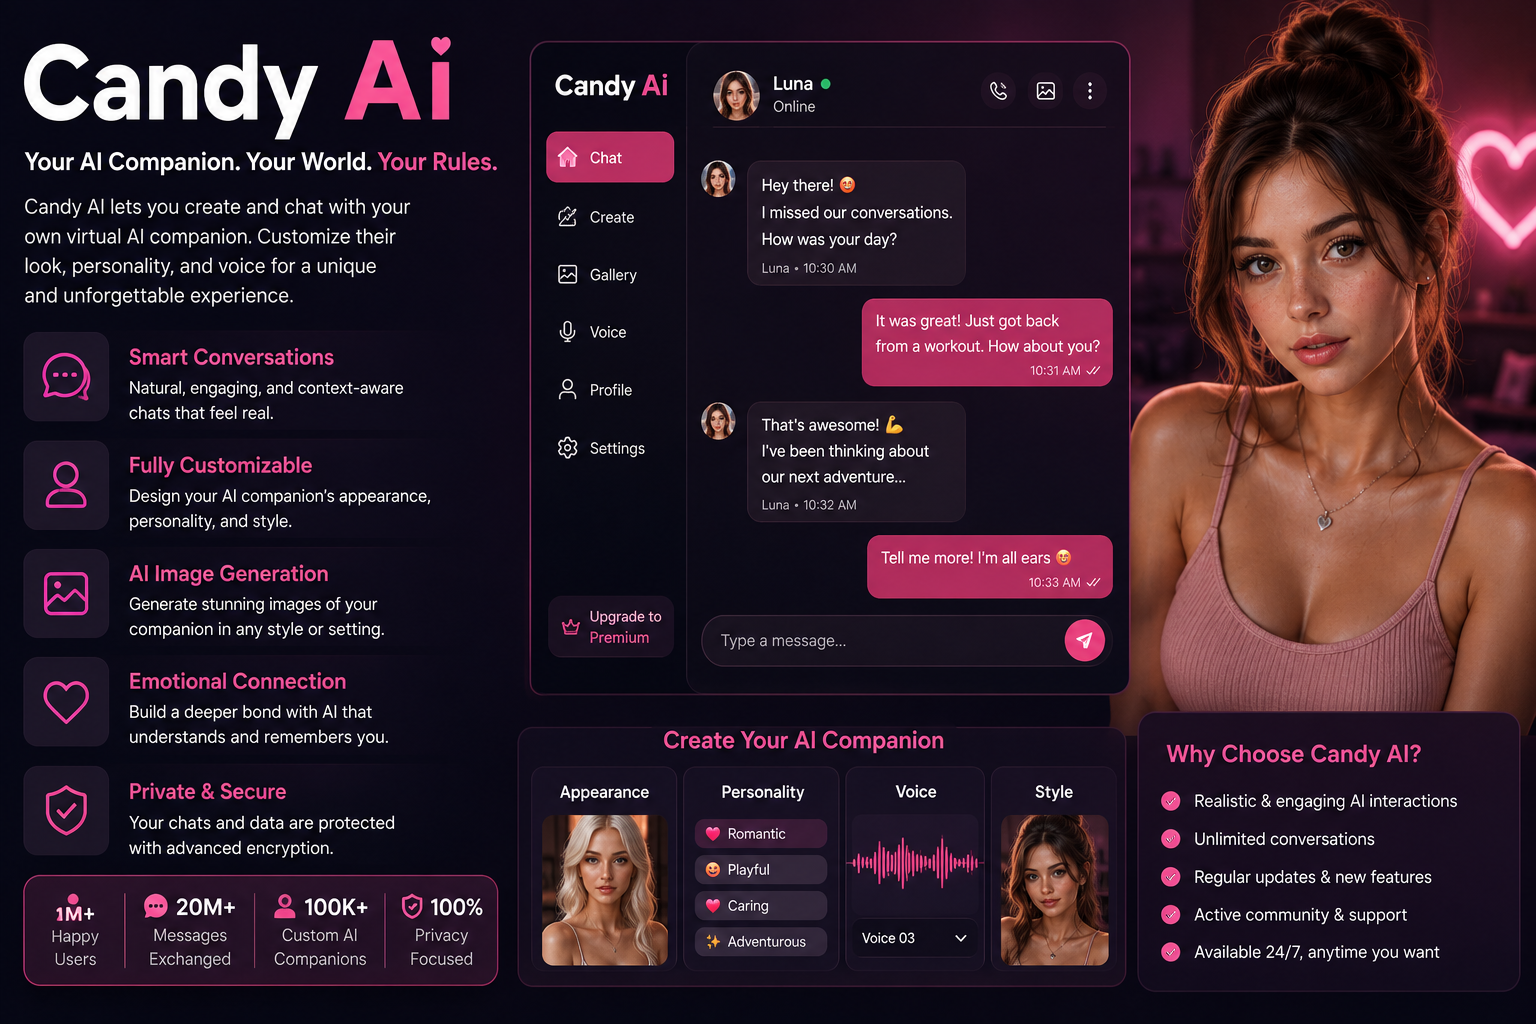
Candy AI has become one of the most discussed platforms in the growing market of AI-powered virtual companions. It combines conversational intelligence, character customization, and interactive experiences to create personalized digital relationships Many users are drawn to the platform because it offers a highly customizable environment where AI characters can adapt to preferences, communication styles, and engagement patterns This flexibility has helped Candy AI stand out among competing AI companion services As artificial intelligence continues to evolve, Candy AI represents a fascinating example of how technology can create more personalized and engaging interactions between humans and digital assistants.
Quick Bio
| Feature | Details |
|---|---|
| Feature | Details |
| Name | Candy AI |
| Category | AI Companion Platform |
| Primary Use | Virtual companionship and AI interaction |
| Origin | Artificial Intelligence Industry |
| Industry | Technology & AI Applications |
| Core Technology | Natural Language Processing (NLP) |
| Common Interface | Web-Based Platform |
| Main Audience | Adults seeking AI interactions |
| Customization | Character appearance and personality settings |
| Popular Applications | Chatting, roleplay, entertainment, companionship |
| Key Benefit | Personalized AI conversations |
| Future Potential | Advanced emotional intelligence and realism |
What Is Candy AI?
Candy AI brings lifelike chat partners to life using smart tech behind the scenes. From playful talkers to thoughtful listeners, each character shapes replies like real conversation. Talking unfolds smoothly because responses grow from deep learning patterns. These digital friends adapt without sounding robotic. Interaction feels familiar, yet different every time. Behind each message sits a system trained to mirror human rhythm. Characters stay engaging by picking up on subtle cues. The experience shifts slightly with every exchange. Realism comes not from scripts but from dynamic understanding. Each moment builds on what was said before.
Starting with how you look, users shape their avatar’s features. Appearance choices come first, then mood patterns follow. One trait builds on another, crafting distinct digital selves. Communication habits round things out, fitting behavior to identity.
The Origins of Candy AI
The rise of AI companions emerged from advancements in machine learning and conversational technology. As language models became more sophisticated, developers began creating platforms that offered more engaging and personalized experiences.
Candy AI entered this space by emphasizing character customization and interactive communication.
How Candy AI Works
The platform utilizes Natural Language Processing (NLP) and machine learning algorithms to generate responses. These technologies analyze user inputs and produce contextually relevant conversations.
The result is a more fluid interaction that feels responsive and tailored to individual preferences.
AI Conversation Engine
The conversational framework is designed to maintain context across discussions. This helps interactions feel more consistent and engaging over time.
Personalization Algorithms
User preferences influence character behavior, communication style, and interaction patterns, creating a more customized experience.
Key Features of Candy AI
Several features contribute to the platform’s popularity.
Character Customization
Users can create virtual companions with unique appearances, personalities, interests, and communication traits.
Interactive Conversations
The system supports dynamic discussions that adapt based on previous interactions and user preferences.
Image Generation Capabilities
Some versions include AI-generated visual content that complements character interactions and storytelling experiences.
Why Users Choose Candy AI
People engage with AI companions for different reasons. Some enjoy creative conversations, while others appreciate the entertainment value and personalized interactions.
The ability to shape a character’s personality often creates a more immersive experience than traditional chatbots.
The Technology Behind Candy AI
The platform relies on multiple AI technologies working together.
Natural Language Understanding
This technology helps the system interpret user intent and context more accurately.
Machine Learning Models
Continuous learning and optimization improve conversation quality and responsiveness.
Personalization Systems
Behavioral patterns help tailor interactions to individual user preferences.
Popular Uses of Candy AI
The flexibility of Candy AI supports various applications.
Entertainment
Many users enjoy interactive storytelling and character-driven conversations.
Creative Writing Support
Writers sometimes use AI companions for brainstorming ideas, character development, and dialogue inspiration.
Virtual Companionship
Some individuals appreciate having an AI character available for regular conversation and engagement.
Advantages of Candy AI
The platform offers several notable benefits.
Customization, availability, and interactive communication are among the most frequently cited advantages.
Users can engage whenever convenient without scheduling constraints.
Candy AI Compared to Traditional Chatbots
Traditional chatbots often focus on answering questions or completing tasks.
Candy AI places greater emphasis on personality, continuity, and relationship-building experiences, creating a more engaging interaction model.
Privacy and Safety Considerations
Users should always review platform policies before sharing personal information.
Understanding data handling practices and privacy controls helps ensure a safer experience while using AI companion technologies.
Commercial Growth and Market Influence
The AI companion sector has expanded rapidly in recent years. Increased interest in personalized digital experiences has contributed to the growth of platforms like Candy AI.
This market continues attracting investment as artificial intelligence capabilities improve.
Community and User Experience
User communities often share customization tips, character designs, and interaction strategies.
These communities contribute to platform engagement and help new users maximize available features.
Challenges Facing Candy AI
Despite its popularity, Candy AI faces several challenges.
Developers must balance realism, user expectations, privacy concerns, and evolving regulations while maintaining a high-quality experience.
Future Trends for Candy AI
Artificial intelligence advancements are expected to shape the next generation of virtual companions.
Improved Emotional Intelligence
Future systems may better understand emotional context and respond with greater nuance.
Enhanced Personalization
Customization options are likely to become even more detailed and adaptive.
Real-Time Learning
Future AI companions may adjust more effectively based on ongoing user interactions.
The Broader Impact of AI Companions
Platforms like Candy AI highlight changing relationships between humans and technology.
As AI becomes more sophisticated, virtual companions may play larger roles in entertainment, creativity, and digital communication experiences.
Best Practices for Using Candy AI
To maximize the experience:
- Define clear expectations for interactions.
- Explore customization features fully.
- Review privacy settings regularly.
- Use the platform responsibly.
- Stay informed about new updates and features.
These practices help users gain the most value from the platform.
Conclusion
One thing stands out about Candy AI – it reshapes how people connect with smart systems. Instead of stiff replies, imagine responses that feel tuned just for you. Picture picking traits, tones, even quirks when shaping your digital partner. Over time, these chats grow less robotic, more like talking to someone who listens. With every update, expect smoother talk, finer details, sharper mimicry of real dialogue. Progress keeps pushing here, quietly refining what feels possible.
FAQs
1. What is Candy AI used for?
Candy AI is primarily used for virtual companionship, interactive conversations, creative engagement, and personalized AI character interactions.
2. Is Candy AI customizable?
Yes. Users can customize character appearance, personality traits, communication styles, and other attributes to create a personalized experience.
3. Does Candy AI use artificial intelligence?
Yes. The platform relies on advanced AI technologies, including Natural Language Processing and machine learning, to generate realistic conversations.
4. Is Candy AI suitable for creative projects?
Many users leverage Candy AI for brainstorming, storytelling, dialogue creation, and character development within creative workflows.
5. What future improvements may come to Candy AI?
Future developments may include enhanced emotional intelligence, more advanced personalization systems, improved realism, and richer interactive experiences.

Fascisterne is a Danish term that translates to “the fascists” in English It is used for supporters of fascism, an authoritarian political ideology linked to nationalism, dictatorship, and anti-democratic rule Understanding the word helps readers interpret history, political language, and modern public debate with more accuracy.
Quick Bio
| Feature | Details |
|---|---|
| Main Keyword | Fascisterne |
| English Meaning | The fascists |
| Language Origin | Danish form of “fascist,” related to Italian “fascismo” and Latin “fasces” |
| Core Definition | People or movements that support fascism or fascist-style politics |
| Historical Origin | Strongly connected with Benito Mussolini’s movement in Italy after World War I |
| Primary Use | Political history, media analysis, education, and public debate |
| Related Terms | fascism, fascist ideology, authoritarianism, nationalism, dictatorship, anti-democracy |
| Common Contexts | European history, World War II studies, political science, and civic education |
| Key Warning Sign | Use of nationalism, scapegoating, violence, and leader worship to attack democracy |
| Modern Application | Used carefully to discuss extremist politics, propaganda, and anti-democratic movements |
Meaning and Word Origin of the Term
Fascisterne translates to “the fascists” in Danish. Often pointing to individuals backing fascist ideals, sometimes it covers organizations too. Movements showing clear signs of fascism might carry the label as well. Groups sharing those traits fall under its reach just like single followers do.
One must handle this word carefully. Not simply name-calling in weighty texts. Points toward a lineage favoring tight control, fierce national pride, tossing aside democratic norms instead. Tradition shaped by rigid authority grows here.
Fascist shapes the core here, pulled straight from Italian fascismo. This term wanders backward to fasces – rods tied tight together, sometimes holding an axe – from ancient Rome.
Out of Mussolini’s push came a sign meant to show strength, control, one people under power. Because of that past, talking about it now still echoes with old regimes and meaning shaped by rule.
Historical Origins in Italy
Modern fascism rose in Italy after World War I, when social unrest, economic stress, and fear of socialism created space for aggressive nationalist movements. Benito Mussolini founded the Fasci Italiani di Combattimento in Milan in 1919 By 1922, Mussolini had become Italy’s prime minister. Over time, the regime weakened democratic institutions, controlled opposition, promoted propaganda, and placed loyalty to the state above individual freedom.
Political Conditions That Helped Fascism Grow
Fascisterne gained support in periods when many people felt anxious, angry, or humiliated. Economic hardship, unemployment, war trauma, and distrust of political leaders made simple, emotional messages more powerful.
Fascist movements often promised order, pride, and national rebirth. Instead of solving problems through open debate, they blamed minorities, leftists, outsiders, or “traitors” inside the nation.
Core Ideology Behind the Movement
Fascist ideology is not one single fixed doctrine, but it has repeated patterns. Supporters usually favor a strong state, strict hierarchy, militarized politics, and a leader who claims to represent the true will of the nation.
This worldview rejects compromise. It treats disagreement as weakness and presents political opponents as enemies rather than citizens with different ideas.
Extreme Nationalism
A central feature of Fascisterne is extreme nationalism. The nation is portrayed as sacred, pure, wounded, or under attack.
This creates an “us versus them” mindset. It can make discrimination look patriotic and turn ordinary social problems into battles over identity.
Leader Worship and Obedience
Fascist movements often build loyalty around a powerful leader. The leader is shown as decisive, heroic, and above normal political limits.
In this system, obedience becomes a virtue. Independent courts, free media, unions, and opposition parties are treated as barriers to national unity.
Anti-Democratic Power
Fascisterne oppose the idea that power should be checked by voters, laws, and institutions. Elections may be used, but only as a tool to gain control.
Once in power, fascist regimes often weaken parliament, intimidate critics, restrict civil rights, and use security forces or party militias to silence resistance.
Symbols, Propaganda, and Public Performance
Fascisterne have often relied on dramatic symbols, uniforms, flags, rallies, slogans, and staged public events. These tools create emotion before reflection.
Propaganda plays a major role. It repeats simple messages, glorifies strength, mocks weakness, and turns complex issues into sharp moral stories.
Fascist Movements Across Europe
Although Italy gave fascism its original political name, similar movements appeared in other parts of Europe during the interwar years. Germany, Spain, and several smaller movements developed their own authoritarian nationalist styles.
Not every far-right movement is identical. Still, this history shows how political violence, conspiracy thinking, and anti-democratic language can move from the margins into state power.
Fascism and Nazism: Similarities and Differences
Nazism shared many fascist features: dictatorship, mass propaganda, militarism, anti-communism, and contempt for democracy. It also had a central racial ideology, with antisemitism at its core.
Because of that, Nazi Germany is often discussed within the wider study of fascist politics, but it should not be treated as a perfect copy of Italian fascism. The differences matter, especially in education and historical analysis.
Danish Context and Modern Usage
In Danish, Fascisterne can be used in historical writing about Italy, Germany, Spain, and wartime Europe. It may also appear in journalism, political commentary, and classroom discussions.
The word has a strong emotional charge. Writers should explain what they mean, especially when discussing modern groups, because careless labeling can weaken the accuracy of an argument.
Today, Fascisterne is often used when people discuss authoritarian politics, extremist groups, propaganda, or threats to democracy. The term appears in debates about nationalism, hate speech, political violence, and online radicalization.
A careful writer avoids using the word as a casual attack. The better approach is to compare behavior with clear traits: anti-democratic goals, scapegoating, political intimidation, and praise for dictatorship.
Why This History Still Matters
Studying Fascisterne helps people recognize how democratic societies can be pressured from within. Fascism does not always arrive with clear labels. It can begin with fear, resentment, and promises of national rescue.
This topic also improves media literacy. When readers understand propaganda patterns, they can better evaluate political claims, emotional slogans, and attempts to dehumanize opponents.
Common Misunderstandings and Responsible Writing
Fascism isn’t just some old chapter tucked away in history books. Though time moves forward, echoes of its words, methods, and raw feelings quietly surface again – different wrapping, familiar core. A pattern repeats without saying its name.
Not all rigid views are fascist – that label gets misused too often. What actually counts involves more than just being strict. Power held by one leader, a push for national strength above all else, rejection of democratic systems – those fit better. Force isn’t just used; it’s praised. The mix defines it, not mere disapproval of change.
Start by pinning down what Fascisterne actually means. A clear definition sets the stage. History shapes its meaning, so trace events that gave rise to it. Facts stand on their own – keep interpretations apart. Choose words carefully; vague terms blur understanding. Evidence needs context, not assumptions. Meaning shifts when details get lost. Stay grounded in what can be shown. Opinions follow facts, never lead them.
Most times, a good piece stays calm instead of shouting. Understanding politics comes easier when words aren’t twisted just to grab attention.
Conclusion
This keyword is more than a translated political label. It is a word tied to one of the most serious warnings in modern history: democracy can be damaged when fear, nationalism, propaganda, and authoritarian leadership work together For students, writers, and readers, the best way to understand the subject is to study the facts, recognize the patterns, and use the term with accuracy. Clear language helps protect serious debate—and serious debate is one of democracy’s strongest defenses.
FAQs
1. What does Fascisterne mean?
Fascisterne means “the fascists” in Danish. It refers to people or groups associated with fascism, especially authoritarian nationalist movements that oppose liberal democracy.
2. Is Fascisterne the same as Nazis?
Not exactly. Nazism shared many fascist traits, including dictatorship and propaganda, but it also centered racial ideology and antisemitism in a specific way. Nazism is usually studied as part of the wider history of fascist and totalitarian movements.
3. Where did fascism begin?
Modern fascism began in Italy after World War I. Benito Mussolini’s movement grew during a period of social unrest, political conflict, and fear of socialism.
4. Why is the word Fascisterne still used today?
The word is still used because fascist ideas and tactics remain important in history, political science, journalism, and civic education. It helps describe anti-democratic movements when used with evidence and care.
5. How should writers use Fascisterne in an article?
Writers should define the term clearly, give historical context, and avoid using it as a loose insult. The strongest use is evidence-based, linking the word to traits such as authoritarianism, extreme nationalism, propaganda, and political intimidation.
Nerwey is a modern keyword linked with online identity, content platforms, and flexible digital branding. It can describe a web name, a publishing idea, or a clean brand concept built for easy recall. This guide explains its meaning, uses, value, and possible future in clear, practical words.
Quick Bio
| Feature | Details |
|---|---|
| Core Definition | Nerwey is an emerging digital-style term often linked with online platforms, modern branding, and content-based web identity. |
| Origin | The exact origin is not firmly documented, but the word appears in recent web use as a coined or brand-like name. |
| Primary Use | It is mainly used as a unique name for digital publishing, information websites, personal brands, and online projects. |
| Industry | Commonly connected with web publishing, digital media, blogging, technology content, lifestyle content, and brand development. |
| Common Materials | Domain names, logos, website themes, editorial calendars, images, social profiles, newsletters, and content management tools. |
| Popular Applications | Online magazines, niche blogs, brand portfolios, media startups, search-friendly content hubs, and creative web communities. |
What Is Nerwey?
What if Nerwey showed up not as a rigid label but something fluid? Picture it shifting, depending on where you see it – on a site, in posts, among people online. Not locked down by definition. More like a sign that changes shape based on who uses it and how they use it. Meaning builds slowly, through motion, through context. A name doing double duty: identifier plus vibe.
Open in meaning, the name hits quick because it’s brief. Since it doesn’t lock into just one thing, people shaping things can apply it to sites about knowing stuff, making marks, putting work out, tech news, living ways, or broad knowledge spots.
Meaning and Name Origin
The exact origin of Nerwey is not clearly recorded in public language sources. That makes it different from old trade terms or traditional craft names. It appears to be a coined digital word, which means its value grows through repeated use, clear branding, and audience recognition. Names like this are often chosen because they are easy to remember. This one has a smooth structure, a modern spelling, and a broad feel. These qualities make it useful for a project that wants to sound fresh without being locked into one topic.
Historical Background and Early Web Use
Many online terms begin as names before they become searchable concepts. This keyword follows that pattern. It is seen around informational websites and digital magazine-style pages, where the word is used as a platform identity rather than a traditional product category. This matters because a new keyword can build authority when its meaning is explained clearly. A site using Nerwey should define the term early, connect it with helpful topics, and repeat its meaning across pages in a natural way.
Main Purpose and User Intent
People searching for Nerwey may have different goals. Some may want to know what it means. Others may be looking for a website, a brand, a digital platform, or a content project connected with the name. For that reason, content around the term should answer several search intents at once. A strong page should explain the definition, background, uses, brand value, online applications, and future potential without making the reader work hard.
Modern Applications of Nerwey
The keyword can fit many modern web uses because the name is broad and adaptable. It can support an online magazine, a business blog, a creative portfolio, a tech guide, or a general knowledge hub. The best use depends on how the brand is positioned. If it is used for a blog, the content should be organized into clear categories. If it is used for a company, the message should focus on trust, clarity, and service value.
Content Publishing and Digital News
One strong application is content publishing. A platform built around this identity can cover topics such as business, technology, entertainment, lifestyle, travel, education, and web trends. To make this work, the platform needs a consistent editorial system. That includes topic clusters, simple headlines, updated articles, clear author pages, and easy navigation. These details help readers understand what the site offers and why they should return.
Branding, Naming, and Online Identity
Nerwey also works well as a brand identity because it is short and not too literal. A literal name can limit growth, while an open name allows a brand to expand into new areas. For example, a website that starts with tech explainers could later add business guides, lifestyle features, or interviews. The name still fits because it does not force the brand into one small category.
Materials, Tools, and Digital Assets
Since Nerwey is mainly a digital concept, its “materials” are not wood, metal, or fabric. The real materials are digital assets. These include a domain name, logo, typography, color palette, website layout, images, article templates, and social media handles. A strong digital asset system makes the brand easier to recognize. The logo should be clean, the colors should be consistent, and the writing style should stay simple. Over time, these small details create a stronger memory in the reader’s mind.
Industry and Commercial Variations
The name can be used in several industries. In media, it can become a publishing platform. In marketing, it can work as a content hub. In education, it can become a learning resource. In business, it can support a service website or professional brand. Commercially, the identity can be shaped in different ways. A site using it may earn through display ads, sponsored posts, affiliate guides, digital products, newsletters, consulting pages, or brand partnerships. The best model depends on audience trust and content quality.
Regional and Cultural Connections
Nerwey does not appear to belong to one confirmed region, language, or traditional culture. That can be an advantage for a global web project. A neutral coined name can speak to readers from many countries without feeling too local. Still, regional identity can be added through content. The platform could focus on UK news, Pakistani business, European travel, American entertainment, or global technology. The name stays flexible while the content gives it direction.
Design Style and Visual Identity
A good visual identity for Nerwey should feel clean, modern, and readable. Soft colors, bold headings, simple icons, and strong spacing can make the brand look premium without making it complicated. The design should also match the content type. A news-style platform needs fast scanning and clear categories. A creative brand can use more visual storytelling. A business-focused project should use a polished layout with trust signals, contact details, and strong service pages.
Search Value and Topic Coverage
Nerwey has useful search potential because it is not crowded like common keywords. A focused website can build topical authority by explaining the term and connecting it with related ideas such as digital branding, online publishing, content strategy, web identity, modern blogging, and media platforms. The key is not to repeat the keyword too much. The better method is to build meaning around it. Use clear subtopics, answer real questions, and create pages that solve specific problems for readers.
Common Mistakes to Avoid
The biggest mistake is using Nerwey without explaining it. If a visitor lands on a page and cannot understand the name within a few seconds, they may leave. Another mistake is making the brand too broad without structure. A flexible name still needs clear categories, a defined audience, and a steady publishing plan. Without these, the website can feel random instead of useful.
Future Trends for Nerwey
The future of this keyword depends on how consistently it is used. If the name is tied to helpful content, a strong design system, and a clear audience, it can grow into a recognizable online identity. Future growth may include newsletters, social communities, video content, mobile-friendly guides, expert interviews, and niche topic hubs. The more useful the content becomes, the more meaning the name gains.
Conclusion
Open roads stretch ahead for Nerwey – clean lines meet fresh chances in web presence or story spaces. Where one path ends, another begins: blank space waits, shaped by bold choices in layout, words that stick, direction without noise.
A strong name grows when meaning comes first. Put clarity up front, then let usage flow without force. Helpful pages show purpose better than slogans ever could. Consistency ties things together, no matter where people find you. Shape matters just as much as sound. When set right, trust builds slowly. A name might turn into a place people return to.
FAQs About Nerwey
1. What does Nerwey mean?
It is an emerging digital-style term often used as a brand-like name for online platforms, publishing projects, and content websites. Its meaning is flexible, so it can be shaped around the purpose of the website or business using it.
2. Is Nerwey a brand, website, or general term?
It can be all three depending on context. Some people may search for it as a website name, while others may treat it as a concept connected with digital identity, online media, or modern content publishing.
3. Why is Nerwey useful for online branding?
It is short, memorable, and not limited to one niche. That makes it useful for blogs, magazines, portfolios, marketing pages, or digital platforms that may expand into different topics over time.
4. What topics can a Nerwey website cover?
A website with this name can cover technology, business, lifestyle, entertainment, travel, education, digital trends, and general knowledge. The important thing is to organize topics clearly so readers know what the platform stands for.
5. How can someone build authority around Nerwey?
Start by defining the term, then create helpful content around related topics such as web publishing, brand identity, content planning, digital media, and audience trust. Consistent design, updated articles, and clear navigation can also build long-term authority.
Disclaimer
The information in this article is provided for general informational and educational purposes only. Nerwey is discussed as an emerging digital-style keyword and brand-related term based on available public usage. Since its meaning may vary by website, platform, or context, readers should verify details from official sources before making business, branding, or investment decisions.


SFM Compile: The Complete Guide to Compiling Models, Maps, and Assets in Source Filmmaker

Best Ensalada de Arvejas y Jamon Near Me: A Fresh Guide to This Creamy Classic

Mansutfer: Meaning, Uses, Benefits and Future Value

Pabington: The Definitive Guide to a New Era of Lifestyle and Design

Galoble: The Definitive Guide to Global Connectivity and Local Synergy in the Digital Age

AHGRL: The Definitive Guide to Advanced Hybrid Governance and Resource Logic
-
 Blogs4 months ago
Pabington: The Definitive Guide to a New Era of Lifestyle and Design
-
 Blogs4 months ago
Galoble: The Definitive Guide to Global Connectivity and Local Synergy in the Digital Age
-
 Blogs4 months ago
AHGRL: The Definitive Guide to Advanced Hybrid Governance and Resource Logic
-

 Tech4 months ago
Fanquer: The Definitive Guide to the New Frontier of Digital Engagement
-

 Blogs4 months ago
Printely: The Future of Personalized Printing and Digital Commerce
-

 Tech4 months ago
Cñims: The Future of Integrated Digital Management Systems in 2026
-

 Tech4 months ago
DowsStrike2045 Python: The Definitive Guide to Next-Gen Framework Management
-

 Sports4 months ago
Cricfooty: The Ultimate Digital Hub for Cricket and Football Fans